December 28, 2010

Use sqlite3 with codeigniter

Codeigniter is a small, fast, and well-documented web framework. However, currently (as of version 1.7.3), only sqlite2 is supported. I made codeigniter 1.7.3 work with sqlite3, including the scaffolding feature, which I really like.

Here is how to make codeigniter 1.7.3 work with sqlite3:

1. Download the php-based sqlite3 PDO driver for codeigniter. This driver is based on the driver in the codeigniter wiki, but fixed up so it works with v1.7.3 and with scaffolding.

Download the sqlite3 PDO driver (based on the wiki driver 0.2)

2. Edit system/database/DB_driver.php,  around line 831, add the 4 lines below starting with '+'.


foreach($query->result_array() as $row)
{
if (isset($row['COLUMN_NAME']))
{
$retval[] = $row['COLUMN_NAME'];
}
+ else if ($this->platform()=="pdo")
+ {
+ $retval[] = next($row);
+ }
else
{
$retval[] = current($row);
}
}


3. Create directory /pdo in /database/drivers and copy to this directory
  driver *.php files
4. Create SQLite3 database file, and put it to any directory.
  My database file is [APPPATH]/db/base.db
5. In application database config [APPPATH]/config/database.php  set next settings:
 
$db['default']['hostname'''; 
$db['default']['username''';
$db['default']['password''';
$db['default']['database''sqlite:'.APPPATH.'db/base.db';
$db['default']['dbdriver''pdo'

Enjoy.

December 27, 2010

vimdiff ignoring white space

I had been searching for a way to ignore white spaces while using vimdiff. Unfortunately, vimdiff -h yields the generic Vim help. I finally found that including the following line in vimrc solves the problem.
set diffopt+=iwhite
From the command line:
vimdiff -c 'set diffopt+=iwhite' ...
 

December 22, 2010

codeignitor removes index.php

Ok, try
<IfModule mod_rewrite.c>
    
RewriteEngine On
    RewriteBase 
/

    
RewriteCond %{REQUEST_FILENAME} !-f
    RewriteCond 
%{REQUEST_FILENAME} !-d

    RewriteRule 
^(.*)$ /index.php?/$1 [L] <-- do not forget the after index.php!
</
IfModule>

<
IfModule !mod_rewrite.c>
    
# If we don't have mod_rewrite installed, all 404's
    # can be sent to index.php, and everything works as normal.

    
ErrorDocument 404 /index.php</IfModule
in config.php set
$config['index_page'"";$config['uri_protocol']    "AUTO"
With this htaccess index.php-hiding works for me with PHP4 and PHP5 running PHP as a CGI

Corss Compile tcpdump for linux/mips

1. download libpcap (I use version 1.1.1 at the time of post) and tcpdump (v4.1.1 as of time of post)

2. unzip both directory under the same directory, such as download/libpcap-1.1.1 and download/tcpdump-4.1.1


Build libpcap:

3. cd libpcap-1.1.1 ;

4. vi configure; search for "linux version", and remove the entire section of "case" under "linux)" until "do we have the wireless extensions". This is so that ./configure does not try to detect linux (and fail). Our linux is fine.

5. CC=/YOUR-CROSS-COMPILER-PATH/mips-openwrt-linux-gcc ./configure --host=mips-linux  --with-pcap=linux
6.  make. after make is successful, you'll have a libpcap.a

Build tcpdump:

7. cd ../tcpdump-4.1.1

8 .vi configure; earch for "linux version", and remove the entire section of "case" under "linux*)" until ";; \n *)".

9. CC=/YOUR-CROSS-COMPILER-PATH/mips-openwrt-linux-gcc ./configure --host=mips-linux  --with-pcap=linux


10. vi Makefile; search for /usr/include and remove them; the Makefile by mistake include including files in the host system. Remove them.


11. make. you can strip the final tcpdump if you like. all done.

December 17, 2010

How to cross compile tinyproxy for mips

tinyproxy version: 1.8.2

1. Change the configure file to comment the section containing "Check for asciidoc" until all the way to "ac_config_files=" (not including). Also Remove the lines that test "HAVE_A2X_TRUE".

2. CC=/home/tzhang/filter/trunk/toolchain_bin/mips-openwrt-linux-gcc ./configure --host=mips-linux --enable-filter --disable-upstream --disable-reverse --enable-transparent --disable-regexcheck

3. modify config.h: search for "rpl_", and comment the two lines that contains rpl_malloc and rpl_remalloc. Use /* */ syntax to comment out.

4. vi src/Makefile, search for "LDFLAGS", and append " -s" to it (to strip the final binary)

5. Chanage Makefile to only build src. Find SUBDIRS , comment out all other directories other than "src".

6. Make. find the binary at src/tinyproxy.

December 16, 2010

bfilter

A web proxy filter that blocks ads, achieves effects like Firfox AdBlock Plus.

http://Bfilter.sourceforge.net

December 15, 2010

vim global command

http://www.networkcomputing.com/unixworld/tutorial/009/009.part3.html

syntax: g/stuff-to-search/[range]EX command

example:

global /^/ + delete
:g/blah/d  , this deletes all lines containging 'blah'
:g/blah/ ,+ delete , this deletes all lines and next lines that containing 'blah'


See more at http://vimdoc.sourceforge.net/htmldoc/cmdline.html#Command-line

December 11, 2010

iptables SO_ORIGINAL_DST

this option in socket call can let you retrieve the original IP and port number of a redirected TCP session. Brilliant.

December 9, 2010

Git Get Started

Getting Started
Let's say you have a development project in the directory devproject. Let's start using Git to manage this project.
First off install Git. In Debian and Ubuntu we just need to do "aptitude install git"
cd devproject
git init
git add .
git commit -m "My first commit"
At this point you have all the benefits of a local version control system but no one can see your work. To make it available to other people we'll need to install a remote repository on your server. At home, I only allow people to access my code through SSH so that's the method I am going to talk about here.
ssh alex
mkdir -p /var/git/devproject.git
cd /var/git/devproject.git
git --bare init
exit
Your remote Git server is now configured so let's set up our local repository to talk to the remote repository
cd devproject
git remote add origin ssh://alex/var/git/devproject.git
We can now push our changes to that repository:
git push origin master
 
git clone: clone from a remote a new local repository
git fetch: update the local "remote" directory
git pull: = git fetch + git merge

December 8, 2010

Compile Openssl for Linux MIPS

1. Grab openssl source 1.0.c
2. Grab the Linux-MIPS patch at http://svn.cross-lfs.org/svn/repos/patches/openssl/openssl-0.9.8k-mips_support-1.patch
3. apply the patch: the patch basically just add a few lines to the Configure file. you can do that manually if you want.
4. CC=YOUR-MIPS-CC ./configure linux-mips  (add "shared" if you want to build shared library)
5. make

December 7, 2010

Increase VNC Speed (tightvnc)

  • If you select the "Low-bandwidth connection" option under "Connection profile" a lot of the default options will be changed. You will notice a drastic increase in performance from that allowance.
  • If you want to tweak the connection further, click the "Options" button to see what is under the hood. Choose the "Tight" encoding option to use TightVNC's compression. Select "Use 8-bit color" to reduce the number of colors and therefore increase speed. Below that, slide the compression bar down to its fastest point to make major changes on performance. Keep in mind that this will also affect the image quality.

December 6, 2010

rSync for Windows

1. Download the zipfile for DelteCopy (Without Installer)
2. Unzip it. It includes rsync.exe for Windows
3. copy deltecd.conf to rsyncd.conf
4. run it as a daemon: rsync --daemon --no-detach --config=\PATH\rsyncd.conf
5. if that works, it will open a port on 873 (make sure you firewall is off).
6. to make it permanent, you can use "srvany" to install it as a service.

More detailed instructions can be found at HERE.

Edit Motion Jpeg on Windows

=-=-=-=-=-=-=-=-=-=-=-=-=-=-=-=-=-=-=-=-=-=-=-=-=-=-=-=-=-=-=-=-=
Background:
Digital Still Cameras for the last couple of years have been able to record video. The cameras put the video (and usually PCM aka RAW audio) in either Quicktime (MOV) or AVI containers.

The video codec is usually Motion JPEG (FourCC:MJPG) because the chip in the camera usually makes JPG and making Motion JPEG is a trivial extension since MJPEG is close to sequential JPEGs.

=-=-=-=-=-=-=-=-=-=-=-=-=-=-=-=-=-=-=-=-=-=-=-=-=-=-=-=-=-=-=-=-=
Technical hurdle on the PC:
To be able to play video or audio you need to have a de-compressor to understand the container (eg MOV, AVI) AND a de-compressor for each stream in the container.
Container examples: "MOV" –QuickTime Movie, "AVI" – Windows’ implementation of the “RIFF” format.
video examples: "M2V" -mpeg2 video, "MJPG" - Motion JPEG.
audio example: "PCM" - raw audio, "AC3" - Dolby Digital audio.

The algorithm is either built into the tool (eg MOV decode in QuickTime, Adobe & free tools like MPlayer etc) OR it has to be present as installed component on the PC.

On Windows there are TWO sorts of CODECs. The original "Video For Windows" (VfW) and DirectShow.
Editing tools (in general) ONLY work with VfW codecs.

Windows XP, Vista and Win7 all ship with DirectShow MJPEG codecs, but not VfW ….so easy to watch but you can’t EDIT.

=-=-=-=-=-=-=-=-=-=-=-=-=-=-=-=-=-=-=-=-=-=-=-=-=-=-=-=-=-=-=-=-=
The problem:
So you have these MOV[ MJPEG + PCM ] or AVI[ MJPEG + PCM ] files and want to edit them to do something as simple as put them on a DVD for mom to see the new baby.

=-=-=-=-=-=-=-=-=-=-=-=-=-=-=-=-=-=-=-=-=-=-=-=-=-=-=-=-=-=-=-=-=
The solution:
You can buy a VfW Motion JPEG decoder (eg http://www.morgan-multimedia.com/M-JPEG2000/index.htm )
OR you can get it in freeware.

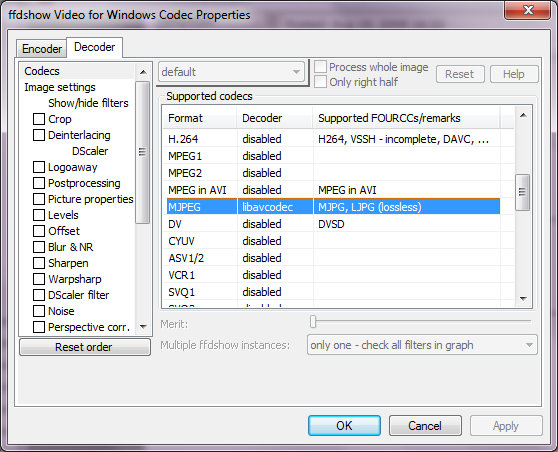
FFDshow ( http://sourceforge.net/projects/ffdshow/ ) uses the libavcodec library developed in the FFmpeg Movie Player ( http://ffmpeg.org/ ) open-source effort. The libavcodec library has TONS of codecs. It is better known for its MPEG4, Xvid, DivX but it also has a lot of others. One of those “others” is MJPG.

The FFDshow project takes that decode (and in some cases encode too) capability and presents them as VfW (as well as DirectShow) codecs!

Viola, you now have the ability to understand MJPEG in video editing tools. (and tons of other codecs if you enable them).

The only thing you need to do after installation is go to the Start Menu’s “FFDShow VFW Configuration” and under the “Decoder” tab’s “Codecs” (at the top). Then on the right side scroll down to MJPEG and change it from “disabled” to “libavcodec”.


=-=-=-=-=-=-=-=-=-=-=-=-=-=-=-=-=-=-=-=-=-=-=-=-=-=-=-=-=-=-=-=-=
An Aside:
This will become more and more important in the years to come because motion films are shot and delivered to digital cinemas as “2k”, “4k” or “8k” ( http://en.wikipedia.org/wiki/Digital_cinema ) in MOTION JPEG2000 ( http://en.wikipedia.org/wiki/JPEG_2000#Motion_JPEG_2000 ) . It’s only so long before INDIE film makers and then pro-sumers want to edit in these resolutions.

‘thanks for reading.

[EDIT - LeChineur had problems with this solution. Instead of you having to read this entire thread I'm putting an edit here to summarize the problem]
In the end it came down to this. LeChineur's FFDshow install didn't work. In summary:

Originally Posted by LeChineur
This got me thinking. So I checked and I indeed did not have the ff_vfw.dll on my system. So I uninstalled the version 3.054 of FFDShow (dated 08/04/2009) which was installed on my system, downloaded and installed version 3.052 (dated 08/03/2009) and voila, I then had the ff_vfw.dll.

That solved the problem. PP now plays the video clip fine, as well as all the other "AVI" (MJPEG) clips from my Canon camera. Incredible!

So rallymax, your original post was in fact correct. Why the version of FFDShow that I first downloaded didn't install the correct dll the first time is still a mystery, but whatever...

December 4, 2010

use .htaccess to protect your web folder

Generate the password file

htpasswd -c .htpasswd fred
(where fred is the username you want to use). You'll be prompted to enter and retype your password, then the .htpasswd file will be created for you.

Next, upload this file to your website. Make sure you place it outside the Web root of your site if possible, as you don't want just anyone to be able to view the file! For example, place it above your public_html or htdocs folder. (Having said this, Apache is often set up by default to block web-based access to files beginning with .ht. Better safe than sorry though!)
If you can't place your .htpasswd file outside your Web root, name it something that's not easily guessable - for example, .htxuymwp - so that people won't be able to find it easily. (In addition, it helps to start the filename with .ht; as mentioned earlier, Apache usually blocks access to files starting with .ht.)

Creating the .htaccess file

Protecting a folder

To password protect a folder on your site, you need to put the following code in your .htaccess file:

AuthUserFile /full/path/to/.htpasswd
AuthType Basic
AuthName "My Secret Folder"
Require valid-user
/full/path/to/.htpasswd should be the full path to the .htpasswd file that you uploaded earlier. The full path is the path to the file from the Web server's volume root - for example, /home/username/.htpasswd or C:\wwwroot\username\.htpasswd. (If you're not sure of the full path to your site or home directory, ask your Web hosting company for this info.)
The above .htaccess file will password protect all files in the folder that it is placed in, and all sub-folders under that folder too. So if you wanted to password protect your entire site, you would place the .htaccess file in your Web root folder.

Protecting a file

To password protect just a single file in a folder, use the following .htaccess file:

AuthUserFile /full/path/to/.htpasswd
AuthType Basic
AuthName "My Secret Page"

<Files "mypage.html">
  Require valid-user
</Files>

This will password protect just the mypage.html file in the folder where you put the .htaccess file.

December 3, 2010

Export Audio from Windows Movie Maker

In Windows Movie Maker....
To save only the audio track of a video clip...
drag the video to the "Audio/Music" track.
Then go to...File > Publish Movie and you'll get options
for audio quality and save it to a wma audio file.

This will result in a .wma audio file. Be sure
to drag the clip all the way to the left on the
timeline or you will have dead air at the
beginning.

December 1, 2010

How to turn a Windows application into Windows Service

http://www.tacktech.com/display.cfm?ttid=197

The Windows NT/2000 Resource Kit provides two utilities that allow you to create a Windows user-defined service for Windows applications and some 16-bit applications (but not for batch files).

Whats needed for Windows NT/2000:
Instrsrv.exe installs and removes system services from Windows NT/2000
Srvany.exe allows any Windows application to run as a service.
You can download both files here srvany.zip

This zip includes three files. The two you need srvany.exe and instsrv.exe to install the services and also srvany.wri which documents everything you can do with the program.
Note: Make sure the Services Manager is closed while running the DOS commands.


You will need to put these files in a directory called reskit At a MS-DOS command prompt(Start | Run | "cmd.exe"), type the following command:
<path>\reskit\INSTSRV.EXE "Service Name" <path>\reskit\SRVANY.EXE
This creates the service in the Services manager and the registry keys to setup what program to run.

http:www.tacktech.com/


Next open regedit.exe Start | run | regedit.exe

http:www.tacktech.com/


Next navigate to this registry key.
HKEY_LOCAL_MACHINE\SYSTEM\CurrentControlSet\Services\service name

http:www.tacktech.com/


From the Edit menu, click Add Key and name it Parameters
Next from the Edit menu, click Add Value and type this information.
Value Name: Application
Data Type : REG_SZ
String : <path>\<application.ext>

http:www.tacktech.com/


Now you can start your service from the Service Manager

http:www.tacktech.com/


With this same program you can remove the service also. Just run this command from command prompt.
<path>\reskit\INSTSRV.EXE "Service Name" REMOVE

November 30, 2010

Free online screen sharing website

http://www.mikogo.com/

If you couple this with freeconference.com, you've got a free webcast solution. :-)

To map a list of addresses

If you have a list of addresses you want to map, you can use Google Fusion Tables. Just import your EXCEL file and tell it which column is address, it will do the rest. Great product.

November 23, 2010

qq protocol analysis

the popular QQ protocol is reimplemented by open source community at eva.sourceforge.net, it is also known as libeva.


libeva is used by gaim, miranda and others for adding support to QQ.


The QQ packet is encrypted using TEA algorithm. The session key is created when login. The KEK (key encryption key) is MD5(MD5(password)), and another layer of trivial hard-coded key TEA encryption. In order to sniff QQ, one has to know the login password and therefore to derive the session key.

libyahoo2 for yahoo messenger

library to write your own yahoo messenger or understand the yahoo protocol:


http://libyahoo2.sourceforge.net/

November 21, 2010

google app email server setup

If you use a hosting company and use gmail app, in order to receive email correctly, you need to do two things:

1. set MX record of your domain to gmail app, see <creating mx records> at gmail app help. The current mx records are:

Priority Mail server
1 ASPMX.L.GOOGLE.COM
5 ALT1.ASPMX.L.GOOGLE.COM
5 ALT2.ASPMX.L.GOOGLE.COM
10 ASPMX2.GOOGLEMAIL.COM
10 ASPMX3.GOOGLEMAIL.COM

2. create SPF record, i.e.  a 'TXT' entry on your domain DNS, with value as:
"v=spf1 include:_spf.google.com ~all"

The second thing is to prevent spam. It is required by google app, otherwise you mail will be bounced.

November 14, 2010

http proxy with virus scan

http://www.server-side.de/index.htm

November 12, 2010

grep with less and color

When you simply run grep --color it implies grep --color=auto which detects whether the output is a terminal and if so enables colors. However, when it detects a pipe it disables coloring. The following command:
grep --color=always -R "search string" * | less -R
Will always enable coloring and override the automatic detection, and you will get the color highlighting in less.


You can add these to your bashrc aliases:


alias grep='grep --color=always'
alias less='less -R'


ubuntu install security updates only

just run:

sudo unattended-upgrade

config file is located at: /etc/apt/apt.conf.d/50unattended-upgrades

This command will enable the automatic security update:

sudo dpkg-reconfigure -plow unattended-upgrades

November 11, 2010

vim: list of color groups

In Vim, to see a list of color groups, use
:hi

or the complicated version:

:so $VIMRUNTIME/syntax/hitest.vim


Then you can use the group name in :match command

:help \bar to see multiple string match

For Example, the following command highlights ring or later using the color-group DiffText

:match DiffText /ring\|later/

November 4, 2010

Drop Linux kernel Cache to make your memory really free

drop_caches

Writing to this will cause the kernel to drop clean caches, dentries and inodes from memory, causing that memory to become free.
To free pagecache:
  • echo 1 > /proc/sys/vm/drop_caches
To free dentries and inodes:
  • echo 2 > /proc/sys/vm/drop_caches
To free pagecache, dentries and inodes:
  • echo 3 > /proc/sys/vm/drop_caches
As this is a non-destructive operation, and dirty objects are not freeable, the user should run "sync" first in order to make sure all cached objects are freed.
This tunable was added in 2.6.16.

October 19, 2010

Super Cheap solid Wireless Access Point

http://www.ubnt.com/nanostationloco

only $49

October 8, 2010

Difference between typedef and define in C

here are two differences between define and typedef.

Firstly, typedef obeys scoping rules just like variables, whereas define
stays valid until the end of the file (or until a matching undef).

Secondly, some things can be done with typedef that cannot be done with define.
Examples:

Code:
typedef int* int_p1;
int_p1 a, b, c;  // a, b, and c are all int pointers.

#define int_p2 int*
int_p2 a, b, c;  // only the first is a pointer!
Code:
typedef int a10[10];
a10 a, b, c; // create three 10-int arrays
Code:
typedef int (*func_p) (int);
func_p fp // func_p is a pointer to a function that
          // takes an int and returns an int


Source: http://www.go4expert.com/forums/showthread.php?t=13405

September 21, 2010

yahoo imap and STMP server, FREE to ALL

According to Wikipedia, Yahoo has free IMAP services.
"Free IMAP and SMTPs access
It is possible to get direct IMAP access without signing up for paid access nor using software like YPOPs! or FreePOPs. Yahoo operates IMAP servers (imap.mail.yahoo.com in particular), which are globally accessible. However they require a specific, but non-standard IMAP command to be sent before login is done. The command is: “ID ("GUID" "1")” and it is relatively easy to modify any email client to send it. In fact this is the method currently employed by YPOPSs! and FreePOPs. There are modified version of Mutt and Mozilla Thunderbird available that send this command.[23]

There is also an IMAPs server running at imap-ssl.mail.yahoo.com. It is using SSL on the standard port 993.

In addition it is also possible to send mail through mail clients as yahoo also operates an SMTP server (smtp.mail.yahoo.com). It is necessary to enable SSL through port 465. The username is the user's Yahoo mail address and the password is the same as for webmail access, this applies to both IMAP and SMTPs access.yahoo mail address and th e password is the same as for webmail access, the applies to both IMAP and amtps access."

Source(s):

September 17, 2010

Cross Compile cherokee 1.0.8 to ARM

 ac_cv_func_malloc_0_nonnull=yes   \
  ac_cv_func_realloc_0_nonnull=yes  \
./configure                         \
  --host=arm-linux           \
  --disable-readdir_r               \
  --disable-tls                     \
  --enable-static-module=all        \
  --enable-trace                    \
  --enable-static                   \
  --enable-shared=no                \
  --enable-beta                     \
  --disable-ipv6 \
  CC=arm-linux-gcc

 make
you will get an errro about readdir_mutex.

go to file cherokee/util.c line 400, changed it to:

#if defined(HAVE_PTHREAD)

now you are good to go, just type make and the final files are in cherokee/{cherokee,cherokee-worker}

To run Cherokee on an embedded platform:
1. download cherokee-worker, cherokee
2. create a conf file with the following contents:

server!bind!1!port = 80
server!timeout = 60
server!keepalive = 1
server!keepalive_max_requests = 500
server!server_tokens = full
#server!encoder!gzip!allow = html,html,txt,css,js
server!panic_action = /web/cherokee-panic
server!pid_file = /var/run/cherokee.pid
server!user = root
server!group = root

# Default virtual server
#
vserver!default!nick = default
vserver!default!document_root = /web
vserver!default!directory_index = index.php,index.html

vserver!default!logger = combined
vserver!default!logger!access!type = file
vserver!default!logger!access!filename = /var/log/cherokee.access
vserver!default!logger!access!buffsize = 16384
vserver!default!logger!error!type = file
vserver!default!logger!error!filename = /var/log/cherokee.error

vserver!default!rule!1!match = default
vserver!default!rule!1!handler = common
vserver!default!rule!1!handler!iocache = 0

vserver!default!rule!99999!match = extensions
vserver!default!rule!99999!match!extensions = php
vserver!default!rule!99999!handler = fcgi
vserver!default!rule!99999!handler!balancer = round_robin
vserver!default!rule!99999!handler!balancer!type = interpreter
vserver!default!rule!99999!handler!balancer!source!1 = 1
vserver!default!rule!99999!handler!balancer!local1!host = 127.0.0.1:1234
vserver!default!rule!99999!handler!balancer!local1!env!PHP_FCGI_CHILDREN = 5
vserver!default!rule!99999!handler!balancer!local1!interpreter = /web/php-cgi -b 1234

source!1!env!PHP_FCGI_CHILDREN = 5
source!1!host = 127.0.0.1:1234
source!1!interpreter = /web/php-cgi -b 1234
source!1!nick = php
#source!1!type = interpreter
source!1!type = host


3. create a themes directory with the followings files:

ls themes/default/
theme.css logo.png header.html footer.html entry.html


4. run it "./cherokee -C cherokee.conf"

You can enable tracing to see the traces of cherokee.

September 15, 2010

grep multiple strings

grep "foo\|bar"
grep -E "foo|bar"  
egrep "foo|bar"

September 3, 2010

Determine your linux distribution version

Use 'uname -a' to get kernel info

Use 'cat /etc/redhat-release' to find out redhat/FC release info

Use 'cat cat /etc/debian_version' to find out debian release info

Ubuntu? Just use debian. :-)

List of VOIP phone and their codecs

This table is from http://www.ozvoip.com/voip-codecs/devices/

ClientSupported Codecs
Billion BIPAC 7402VL G.711, G.729
Billion BIPAC-7100SV G.711, G.729
Billion BIPAC7402VGP G.711, G.729
Cisco 7960 G.711, G.729
Draytek Vigor 2100V(G) G.711, G.723.1, G.726, G.729
Draytek Vigor 2500V G.711, G.729
Draytek Vigor 2600V(G) G.711, G.723.1, G.726, G.729
Draytek Vigor 2900V(G) G.711, G.723.1, G.726, G.729
eyeBeam GSM, iLBC, G.711, G.722, G.723.1, G.729, Speex
Grandstream BudgeTone 101 iLBC, G.711, G.723.1, G.726, G.728, G.729
Grandstream BudgeTone 102 iLBC, G.711, G.723.1, G.726, G.728, G.729
Grandstream GXP2000 GSM, G.711, G.722, G.723.1, G.726, G.728, G.729
Grandstream HandyTone 286 iLBC, G.711, G.723.1, G.726, G.728, G.729
Grandstream Handytone 486 iLBC, G.711, G.723.1, G.726, G.728, G.729
Leadtek 8051 G.711, G.723.1, G.726, G.729
Linksys PAP2 G.711, G.723.1, G.726, G.729
Linksys RT31P2 G.711, G.723.1, G.726, G.729
Linksys WRT54GP2 G.711, G.729
MS Office Communicator GSM, G.711, G.722, G.723.1, DVI4, Siren
Octtel SPxxxx Series Gateways G.711, G.729
Polycom SoundPoint IP300 G.711, G.729
Polycom SoundPoint IP500 G.711, G.729
Polycom SoundPoint IP600 G.711, G.729
Siemens optiPoint 400 Family G.723.1
Siemens optiPoint 410 Family G.711, G.723.1
Siemens optiPoint 420 Family G.711, G.722, G.723.1, G.729
Sipura SPA-2000 G.711, G.723.1, G.726, G.729
Sipura SPA-2100 G.711, G.723.1, G.726, G.729
Sipura SPA-3000 G.711, G.723.1, G.726, G.729
Sipura SPA-841 G.711, G.729
sipXphone G.711
SJPhone (free version) GSM, iLBC, G.711
Snom 190 GSM, G.711, G.722, G.723.1, G.726, G.729
Snom 320 GSM, G.711, G.722, G.723.1, G.726, G.729
Snom 360 GSM, G.711, G.722, G.723.1, G.726, G.729
SwissVoice IP 10S iLBC, G.729
Uniden UIP-200 G.711, G.729
Windows Messenger GSM, G.711, G.722, G.723.1, DVI4, Siren
X-lite GSM, iLBC, G.711, Speex
X-Pro GSM, iLBC, G.711, G.729, Speex
Zyxel Prestige 2000W G.711, G.729
Zyxel Prestige 2002 G.711, G.729
Zyxel Prestige 2602HW(-L) G.711, G.729

September 2, 2010

Asterisk SIP PBX simple tutorial / quick start guide

Recently I start to investigate how to make asterisk to be an SIP BPX with small foot print, and I have a running SIP PBX now. Below are the notes on how I got it to run.

Platform: I am running asterisk in Colinux under Windows Vista. Debian 5 is running in Colinux.

Short summary:

version: asterisk 1.4 is stable and used widely. 1.6 is considered short-term support. Supposedly 1.8 is another stable version for long-term support. I use 1.4
source : the source tar gzip of asterisk is about 23MB. It uses the standard "./configure;make;make install" procedure to compile. See README in source tar ball.
structure: asterisk uses a lot of ".so" dynamic libraries, which are called modules and are loaded dynamically when program starts. Which one to load or not to load is controlled by the file "modules.conf". Many of the modules are essential to make asterisk useful, while others are optional for our purpose.
directories: configurations are under /etc/asterisk, modules (dynamic library files are under /usr/lib/asterisk/modules). Other directories are determined in compile-time and are listed in "asterisk.conf"
configurations: Unlike most unix programs, "asterisk.conf" is not what you change the most. In fact, you can probably leave it as is. The files we need to change the most for making a IP PBX are:
  • modules.conf ; for configuring which modules to load or not load
  • sip.conf ; for configuring all sip channels, both external and internal
  • extensions.conf; the heart of the PBX, configures what key press/ what extension does what
  1. apt-get install asterisk
  2. /etc/init.d/asterisk stop.  I like to use console for getting thing to run. so stop the daemon
  3. copy modules.conf below as your modules.conf
  4. copy sip.conf as your sip.conf. I use sipgate as my provider. ( I tested incoming call and outgoing call to toll-free numbers)
  5. copy extensions.conf to yours.
  6. start your asterisk in console mode (asterisk -cvvv)
  7. install x-lite software phone on your Windows and configure it as follows:
  8. now you can dial 123 to hear the playback voice from asterisk. go to asterisk CLI, and type "sip show peers" and you should see two peers, your sipgate and your x-lite phone.
  9. You can now make calls and receive calls. 
  10. For further reading, I recommend the O'reilly book "Asterisk".


modules.con
[modules]
autoload=yes
noload => pbx_gtkconsole.so
noload => pbx_kdeconsole.so
noload => app_intercom.so
noload => chan_modem.so
noload => res_musiconhold.so
noload => chan_alsa.so
noload => chan_oss.so
noload => pbx_dundi.so
noload => pbx_realtime.so
noload => app_directory.so
noload => app_userevent.so
noload => app_voicemail.so
noload => app_voicemail_imap.so
noload => app_voicemail_odbc.so
noload => pbx_ael.so
noload => app_directory_odbc.so
noload => app_zapateller.so
noload => app_zapbarge.so
noload => app_zapras.so
noload => app_zapscan.so
noload => cdr_custom.so
noload => cdr_manager.so
noload => cdr_odbc.so
noload => cdr_pgsql.so
noload => cdr_radius.so
noload => cdr_sqlite.so
noload => chan_agent.so
noload => chan_alsa.so
noload => chan_gtalk.so
noload => chan_iax2.so
noload => chan_mgcp.so
noload => chan_oss.so
noload => chan_phone.so
noload => chan_vpb.so
noload => chan_zap.so
noload => codec_zap.so
noload => format_h264.so
noload => format_jpeg.so
noload => format_mp3.so
noload => format_ogg_vorbis.so
noload => pbx_ael.so
noload => pbx_dundi.so
noload => pbx_loopback.so
noload => pbx_realtime.so
noload => pbx_spool.so
noload => res_config_odbc.so
noload => res_config_pgsql.so
noload => res_jabber.so
noload => res_odbc.so
noload => res_smdi.so
noload => res_snmp.so
noload => res_speech.so
noload => res_watchdog.so

[global]


sip.conf
[general]
context=default
allowoverlap=no
bindport=5060
bindaddr=0.0.0.0
srvlookup=yes

register => YOUR-SIP-ID:YOUR-SIP-PASSWD@sipgate/YOUR-SIP-ID

[sipgate]
type=peer
secret=YOUR-SIP-PASSWD
insecure=invite
username=YOUR-SIP-ID
defaultuser=YOUR-SIP-ID
fromuser=YOUR-SIP-ID
context=sipgate_in
fromdomain=sipgate.com
host=sipgate.com
outboundproxy=proxy.live.sipgate.com
qualify=yes
disallow=all
allow=ulaw
allow=ilbc
allow=g729
dtmfmode=rfc2833
nat=yes

[1000]
type=friend
context=phones
host=dynamic
qualify=yes


extensions.conf
[general]

[globals]

[sipgate_in]
exten => YOUR-SIP-ID,1,Dial(SIP/1000,30,r)
exten => YOUR-SIP-ID,n,Hangup

[sipgate_out]
exten => _X.,1,Set(CALLERID(num)=YOUR-SIP-ID)
exten => _X.,n,Dial(SIP/${EXTEN}@sipgate,30,trg)
exten => _X.,n,Hangup

[phones]
exten => 123,1,Answer()
exten => 123,n,Background(demo-congrats)
exten => 123,n,WaitExten()

include => outbound-long-distance

exten => 2,1,Playback(digits/2)
exten => 2,n,Goto(phones,123,1)

exten => 3,1,Playback(digits/3)
exten => 3,n,Goto(phones,123,1)

exten => i,1,Playback(pbx-invalid)
exten => i,n,Goto(123,1)

exten => t,1,Playback(vm-goodbye)
exten => t,n,Hangup()

[outbound-long-distance]
exten => _91NXXNXXXXXX,1,Dial(SIP/${EXTEN:1}@sipgate,30,trg)
exten => _91NXXNXXXXXX,n,Playtones(congestion)
exten => _91NXXNXXXXXX,n,Hangup()

Free U.S.domestic phone number

You can get it from any of the following providers:

1. Google voice
2. SipGate
3. IPKall
4. IPComms (http://www.ipcomms.net/product-freedid.html)

I use Google voice and SipGate. Any one has used IPComms?

September 1, 2010

voip codecs and bps


  • g.711 is raw data, highest quality, but requires highest bandwidth 
  • g.729a is the next best, very good quality, very low datarate, but it requires a $10 license per channel for asterisk. There is a free version for research and education use at http://asterisk.hosting.lv/
  • iLBC may be the next best, it is free, good quality, and relatively low datarate. Go to this link to find out how to add iLBC back to Asterisk. Remember, you will need to copy the original Makefile in the ilbc folder to the new ilbc folder.
  • GSM quality is acceptable, but not very good.
  • G722 is wide band, hi-def stuff. 

Real bps numbers:
  • GSM: 30kbps
  • g711: 80kbps
  • iLBC: 30kbps
  • g729: 30kbps (why it is this high? bps seen by bwm-ng)
* G.711 has a Mean Opinion Score of 4.3-4.7 and uses 80 kpbs (if you send 50 packets/second with 20 ms of RTP payload per packet) or 74.7 kbps (@ 30 ms, meaning 33.3 packets/second).
* G.729 (NOT G.729a) has a MOS of 3.9-4.2 and uses 24 kbps @ 20 ms or 18.7 kbps @ 30 ms.
* G.729a has a MOS of 3.7-4.2 and uses 24 kbps @ 20 ms or 18.7 kbps @ 30 ms.
* G.723 has a MOS of 3.8-4.0 and uses 17.1 kbps @ 30 ms.

MOS is what nontechnical people think about each codec (5.0 is perfect). All of the above numbers are in EACH direction, so total bandwidth is double the above figures.

As you can see, there is very little quality or bandwidth difference betweeen G.729a and G.723. However, G.729a can send 50 packets/second, each packet containing 20 ms of voice payload. G.723's lowest setting is 30 ms. I think 20 ms sounds better than 30 ms because of smoothing (used to fill in for late packets). That's why I chose G.729a @ 20 ms over G.723 @ 30 ms for my Sipura adapter. (Sipura's default setting is 20 ms (that is, 'RTP Packet Size' = '0.020').)

It would be a very good idea to turn on silence suppression ('Silence Supp Enable' = 'yes'), because it will reduce your bandwidth usage by 65%. (Apparently each person in a two-person conversation only talks about 1/3 of the time.) With my Sipura 2100, I could not hear any difference between silence suppression being on or off.


G729 uses less compression (less latency problems) and has a higher level of voice quality BUT does use more bandwidth. I personally am not fond of g723.1 but usually find g729 to be OK. Some people despise both.

Packet8 started using g723.1 and later switched to g729 most likely due to customer complaints about the poor quality of g723.1 calls.

    How to upgrade SPA942 IP Phone internal directory using wget

    See the post here:
    http://blog.grimsy.net/2007/02/23/spa942-personal-directory/

    A Recap:

    After trying a number of things, I upgraded to the latest firmware (5.1.5 at time of writing) and after some more stuffing around, I was finally able to get the following line to populate the Personal Directory:


    wget --post-data '24686=n%3DGeoff;p%3D6004;r%3D1&25390=n%3DMatt;p%3D6001;r%3D1' http://myphoneIP/pdir.spa


    A few things about the command.
    Firstly, the command will enter in two contacts in the Directory. These will be under entry #5 (24686) and entry #2 (25390). A complete list of all the codes here can be seen in the source of the Personal Directory page in the phone’s web interface.
    So taking the first of the two entries (24686), what we’re posting is:
    n%3DGeoff;
    n=Geoff; (we need to escape the ‘=’ signs so that wget will actually pass the info on correctly)
    n is the Display Name that will appear in the Directory
    p%3D6004;
    p=6004;
    p is the extension number (or phone number). My extension is 6004.
    r%3D1
    r=1
    r is the ring to use. 0 is no sound, just flashing. Play around with the other numbers to find the ringtone you want to use.
    To add more than one entry at a time, simply separate the strings with ‘&’.

    August 31, 2010

    mini2440 flash upgrade

    How to upgrade mini2440/micro2440 kernel image after the systems boots to Linux:

    killall processes
    mount -o remount,ro /
    cd /dev/shm
    flash_erase /dev/mtd1 0 16
    nandwrite -a -p /dev/mtd1 /zImage_new

    Bootloader

    There are two "official" bootloaders, supervivi-128M and viv. supervivi is a little bit less than 256K (0x40000), while vivi is only 3-4K. We have supervivi in NOR flash, and viv in NAND flash.

    0x0,00000 - 0x0,40000    bootloader
    0x0,48000 - 0x0,60000    bootloader parameters (linux_cmd_line           starts at 0x48000 and ends with the first 0x0)
    0x0,60000 - 0x2,60000    2M of kernel space
    0x2,60000 - 0x80,00000   close to 126M application image


    Tools to read/write/erase flash after system is booted (all in mtd-utils project):

            - flash_erase
            - nandwrite
            - nanddump
            - mtd_debug

    echo -n -e "VIVICMDLnoinitrd root=/dev/mtdblock2 init=/linuxrc console=ttySAC0\0000" > /tmp/cmdline
    /cmdc/flash_erase /dev/mtd0 0x40000 1
    /cmdc/nandwrite -p /dev/mtd0 -s 0x48000 /tmp/cmdline


    You can probably use the same nandwrite to update the bootloader itself. I haven't tried that yet.

    Export MySQL database to CSV file

    SELECT * INTO OUTFILE '/tmp/result.text'
    FIELDS TERMINATED BY ',' OPTIONALLY ENCLOSED BY '"'
    LINES TERMINATED BY '\n'
    FROM test_table;

    And the results are sent to /tmp/result.text in CSV format.

    August 27, 2010

    Thunderbird turn off signature in reply emails

    This is how to turn off signature in replies in Thunderbird:

    1. open about:config by go to menu tools->options->advanced->general->Config Editor

    2. type "sig" and look for sig_on_reply as shown below.
    3. double click on it to make it false.
    4. close the window. the value is saved automatically.
    done.

    August 17, 2010

    Remove blank/empty lines from a file

    There are many ways to do it:

    • grep '.' file > newfile
    • awk '/./' file > newfile
    But, please make sure your file is in "Unix" format, not "Dos" format (this concerns the line ending character). If it is in "Dos" format, none of the script works. You can convert it using vim and do "set fileformat=unix" then save, or use dos2unix command.

    August 14, 2010

    Vim embedded command in the file edited

    This is called "modeline" in vim. you can file help on that.

    http://vim.wikia.com/wiki/Modeline_magic

    First, make sure modeline is enabled. Then

    The following examples show some alternatives that could be in a C file:

    // vim: noai:ts=4:sw=4
    -or-
    /* vim: noai:ts=4:sw=4
    */
    -or-
    /* vim: set noai ts=4 sw=4: */
    -or-
    /* vim: set fdm=expr fde=getline(v\:lnum)=~'{'?'>1'\:'1': */

    With "set", the modeline ends at the first colon not following a backslash. Without "set", no text can follow the options, so for example, the following is invalid:

    Error E518: Unknown option: */

    /* vim: noai:ts=4:sw=4 */

    August 10, 2010

    Disable ssh server reverse dns lookup

    Add/Edit the following lines to your /etc/ssh/sshd_config and restart ssh service

    UseDNS no
    GSSAPIAuthentication no

    To enable remote port forwarding for all the computers on your subnet, add this:

    GatewayPorts yes

    August 5, 2010

    Open source Windows TCP Serial port server

    Download the Serproxy zip source code , and compile it using the following Makefile using mingw-32.

    #
    # File:Windows serproxy makefile
    #
    # (C)1999 Stefano Busti
    #

    VERSION = `cat VERSION`

    SRCS = \
    main.c sio.c sock.c thread.c vlist.c cfglib.c config.c string.c \
    pipe.c error.c

    OBJS = \
    main.o sio.o sock.o thread.o vlist.o cfglib.o config.o string.o \
    pipe.c error.c

    CC = gcc

    ifdef DEBUG
    CFLAGS = -Wall -g -D__UNIX__ -DDEBUG
    else
    CFLAGS = -Wall -O2 -fomit-frame-pointer -D__WIN32__ -DWINTHREADS -DSOCK_WIN -DSIO_WIN32
    endif

    ifdef USE_EF
    #LIBS= -lpthread -lefence
    else
    #LIBS= -lpthread
    endif
    LIBS=-lws2_32

    # Build the program

    serproxy: $(SRCS) $(OBJS)
    $(CC) $(CFLAGS) -o serproxy $(OBJS) $(LDFLAGS) $(LIBS)

    install: serproxy
    cp -f serproxy /usr/local/bin

    clean:
    rm -f *.o *~

    realclean:
    rm -f *.o *~ serproxy *.gz *.zip

    dep:
    makedepend -Y -- $(CFLAGS) -- $(SRCS) 2&>/dev/null

    # DO NOT DELETE

    main.o: sio.h sock.h pipe.h thread.h vlist.h cfglib.h config.h error.h
    sio.o: sio.h
    sock.o: sock.h
    thread.o: thread.h
    vlist.o: vlist.h
    cfglib.o: cfglib.h
    config.o: config.h cfglib.h string.h
    string.o: string.h
    pipe.o: pipe.h sio.h sock.h thread.h
    error.o: error.h

    Cross Compile PHP 5.3.3 to ARM

    Updated on 2012/05/08 for Compiling PHP 5.4.2  enabling FPM (fastcgi)

    1. ./configure --host=arm-linux --without-pear --disable-simplexml --disable-mbregex --enable-sockets --enable-pdo --with-pdo-sqlite --with-sqlite3 --disable-all

    2. vi Makefile, search for "-lcrypt", add "-ldl" to the same line.

    3. make -j 12

    4. php-cgi is in sapi/cgi.

    5. use arm-linux-strip php-cgi to strip out the symbols

    Done.

    -- To compile PHP 5.4.2 with FPM enabled--


    1. First edit the "configure" file to remove checking of ptrace and proc mem file (both should be set to yes, broken_ptrace set to no). If you don't need FPM, no change to configure script is necessary.

    My new version of this section looks like this:


      have_broken_ptrace=no
      have_ptrace=yes
        { $as_echo "$as_me:${as_lineno-$LINENO}: result: yes" >&5
    $as_echo "yes" >&6; }


    rm -f core conftest.err conftest.$ac_objext conftest.$ac_ext


        { $as_echo "$as_me:${as_lineno-$LINENO}: checking whether ptrace works" >&5
    $as_echo_n "checking whether ptrace works... " >&6; }


          { $as_echo "$as_me:${as_lineno-$LINENO}: result: yes" >&5
    $as_echo "yes" >&6; }


    rm -f core *.core core.conftest.* gmon.out bb.out conftest$ac_exeext \
      conftest.$ac_objext conftest.beam conftest.$ac_ext


      if test "$have_ptrace" = "yes"; then


    $as_echo "#define HAVE_PTRACE 1" >>confdefs.h


      fi


    ...


        proc_mem_file="mem"

      if test -n "$proc_mem_file" ; then
        { $as_echo "$as_me:${as_lineno-$LINENO}: checking for proc mem file" >&5
    $as_echo_n "checking for proc mem file... " >&6; }

        if test "$cross_compiling" = no; then :
            { $as_echo "$as_me:${as_lineno-$LINENO}: result: $proc_mem_file" >&5
    $as_echo "$proc_mem_file" >&6; }

    rm -f core *.core core.conftest.* gmon.out bb.out conftest$ac_exeext \
      conftest.$ac_objext conftest.beam conftest.$ac_ext
    fi

      fi

    2. CC=arm-none-linux-gnueabi-gcc ./configure --host=arm-linux --without-pear --disable-simplexml --disable-mbregex --enable-sockets --enable-pdo --with-pdo-sqlite --with-sqlite3 --enable-fpm --disable-all

    3. make -j 12
    4. php-fpm is at sapi/cgi
    5. use arm-linux-strip php-fpm to strip out the symbols

    Done.


    August 1, 2010

    Convert FLV to 3GP

    ffmpeg1.exe -i %1 -s 352x288 -acodec libfaac %1.3gp

    July 28, 2010

    PHP PDO Debugging

    When you use PDO in PHP to access your database, make sure you enable debugging, otherwise you will not know what is going on because PDO discards all errors.

    $dbh->setAttribute(PDO::ATTR_ERRMODE, PDO::ERRMODE_EXCEPTION);

    lua for web development on embedded systems

    It is documented HERE

    It looks fairly complicated to set it up with something like minihttpd. Not sure whether it is worth it. We can do it directly with C using cgi.

    July 26, 2010

    zigbee stacks, open source or not

    • TI, z-stack, free but closed-source
    • ATMEL, bit-cloud, free but closed-source
    • MicroChip, zig-bee 2006 stack, FREE AND OPEN SOURCE, See it

    July 16, 2010

    javascript "this" pointer

    "this" pointer is important and handy in DOM and Javascript. Read more here.

    rpm list of files

    To list files in a local RPM file:
    rpm -qlp techrx.rpm

    To list files in a installed rpm package:
    rpm --query --filesbypkg techrx

    vim tab and space

    set smartindent
    set tabstop=4
    set shiftwidth=4
    set expandtab

    and use the following command to change existing tab to space:
    :%retab

    also see:

    :help auto-setting


    July 14, 2010

    PHP pdo apache sqlite3

    I got my php+pdo+sqlite3 to work under apache now. Some tips to remember:

    1. The folder that houses the database file must be writeable by the user "apache"
    2. Database files has to be writable by the user "apache"
    3. after installing php-pdo package, remember to restart apache/httpd service, because mod_php is in memory.
    4. remeber to put the following code at the beginning of the php code to enable debugging:

    ini_set('display_errors', 'On');
    error_reporting(E_ALL);

    5. remember to enable PDO debugging

    try {$handle = new PDO("sqlite:".$db); }
    catch(PDOException $e) { echo $e->getMessage(); return;}
    $handle->setAttribute(PDO::ATTR_ERRMODE, PDO::ERRMODE_WARNING);

    sqlite commands

    To delete all rows in a table do:

    delete from TABLE;

    July 9, 2010

    Difference Between AES CCM and AES CCM* (CCM-Star) used by 802.15.4

    This is from 802.15.4 standard itself p.253:

    With regard to security of the CCM* mode of operation, the CCM* mode coincides with the original CCM mode specification (ANSI X9.63-2001 [B1]) for messages that require authentication and, possibly, encryption, but also offers support for messages that require only encryption. Moreover, it can be used in implementation environments for which the use of variable-length authentication tags, rather than fixed-length authentication tags only, is beneficial. As with the CCM mode, the CCM* mode requires only one key. The CCM* specification differs from the CCM specification, as follows:

    — The CCM* mode allows the length of the Authentication field M to be zero as well (the value M = 0 correspond-
    ing to disabling authenticity because then the Authentication field is the empty string).
    — The CCM* mode imposes a further restriction on the nonce N: it shall encode the potential values for M so that one can uniquely determine from N the actually used value of M.
    As a result, if M is fixed and the value M = 0 is not allowed, then there are no additional restrictions on N, in which case the CCM* mode reduces to the CCM mode. In particular, the proof of the CCM mode applies (Jonsson [B13] and [B14]).
    For fixed-length authentication tags, the CCM* mode is equally secure as the original CCM mode. For variable-length authentication tags, the CCM* mode completely avoids, by design, the vulnerabilities that do apply to the original CCM mode.
    For fixed-length authentication tags, the security proof of the original CCM mode carries over to that of the CCM* mode (also for M = 0), by observing that the proof of the original CCM mode relies on the following properties, which slightly relax those stated in Jonsson [B13] and [B14] (relaxed property indicated in italics):
    — The B0 field uniquely determines the value of the nonce N.
    — The authentication transformation operates on input strings B0 || B1 || B2 || … || Bt from which one can uniquely
    determine the input strings a and m (as well as the nonce N). In fact, for any two input strings corresponding to distinct triples (N, m, a), neither one is a prefix string of the other.
    — All the Ai fields are distinct from the B0 fields that are actually used (over the lifetime of the key), as those have a Flags field with a nonzero encoding of M in the positions where all Ai fields have an all-zero encoding of the integer 0.
    Hence, if M is fixed, then the CCM* mode offers the same security properties as the original CCM mode: confidentiality over the input string m and data authenticity over the input strings a and m, relative to the length of the authentication tag. Obviously, if M = 0, then no data authenticity is provided by the CCM* mode itself (but may be provided by an external mechanism).
    For variable-length authentication tags, the original CCM mode is known to be vulnerable to specific attacks (see, e.g., Section 3.4 of Rogaway and Wagner [B17]). These attacks may arise with the original CCM mode because the decryption transformation does not depend on the length of the authentication tag itself. The CCM* mode avoids these attacks altogether, by requiring that one shall be able to uniquely determine the length of the applicable authentication tag from the Ai fields (i.e., from the counters blocks).
    NOTE 2—With regard to the interoperability between CCM mode and CCM* mode of operation, the CCM* mode reduces to the CCM mode in all implementation environments where the length of the authentication tag is fixed and where the value M = 0 (encryption-only) is not allowed. In particular, the CCM* mode is compatible with the CCM mode, as specified in IEEE Std 802.11i™-2004 (for WLANs) [B7], IEEE Std 802.15.3™-2003 (for WPANs) [B10], and IEEE Std 802.15.4-2003 (for older WPANs).

    July 8, 2010

    ike-scan: a great ipsec tool

    If you want to learn IPsec, start with ike-scan

    And the wiki page is also one of the best ipsec documents.

    http://www.nta-monitor.com/wiki/index.php/Ike-scan_User_Guide#IPsec_VPN_Fingerprinting

    cisco vpn 3000 xauth configuration

    http://www.ciscopress.com/articles/article.asp?p=421514

    Example 4-1. Cisco IOS XAUTH Configuration on the IPSec Gateway

    vpn-gw1-east#
    !
    hostname vpn-gw1-east
    !
    username ezvpn password 0 east
    username ezvpn1@vpngroup password 0 ezvpn1east

    username ezvpn2@vpngroup password 0 ezvpn2east
    aaa new-model
    !
    aaa authentication login vpn local
    aaa authorization network vpn local
    aaa session-id common
    ip subnet-zero
    !
    crypto isakmp policy 1
    encr 3des
    authentication pre-share
    group 2
    crypto isakmp keepalive 10 10
    !
    crypto ipsec transform-set vpn esp-3des esp-sha-hmac
    !
    crypto dynamic-map dynamic 1
    set transform-set vpn
    reverse-route remote-peer 9.1.1.33
    !
    !
    crypto map vpn client authentication list vpn
    crypto map vpn isakmp authorization list vpn
    crypto map vpn client configuration address respond
    crypto map vpn 3 ipsec-isakmp dynamic dynamic

    The addition of the following command on the crypto map enables XAUTH and triggers the XAUTH transaction after IKE phase 1 and before IKE phase 2:

    crypto map map-name client authentication list list-name

    Explanation of Cisco VPN Authentication mode

    1. XAUTH, which really is PSK + XAUTH
    2. mutual group authentication, also known as hybrid
    3. certificate based authentication

    so, to be more specific on the cisco side, there are three types of
    phase 1/1.5 that work with the cisco road warrior ``vpndialer''
    program. You can tell which one your VPN is using by right-clicking
    on its row in Connection Entries, picking Modify, and noting which of
    the following three radio buttons is checked in the Authentication
    tab:

    Group Authentication -- this is pre-shared key + XAUTH, where any
    roadwarrior VPN client has enough
    passphrases loaded into it to impersonate
    the head-end. The PSK is obfuscated in the
    config file, but if you can un-rot13 it, you
    can set up a spoof head-end and MITM nearby
    wireless coworkers' passwords, not only
    hijaaking your way into the VPN without a
    password but probably also getting their
    Master Windows Password to Everything, too,
    thus imagineably making them LESS secure
    than if they'd had no VPN at all.


    Mutual Group Authentication -- This uses a certificate on the
    head-end, but the road warrior
    presents no certificate. Road
    warriors validate the cert against a
    CA certificate pubkey which you must
    load into roadwarriors and use to
    issue the head-end's cert, to stop
    the MITM attack above. It seems to
    be un-confusing, so a lot of sites
    probably use it. It only works in
    aggressive mode, though, because the
    ``client has no identity,'' or some
    other weird IPsec standards-ism.

    This is probably the 'hybrid' you are
    talking about, also known as 'hybrid
    XAUTH'. I understood once but am now
    a bit rusty on how all Cisco's messy
    configuration stanzas reference each
    other, but have this in my notes (for
    requesting it on PIX7.x/ASA head-end):

    tunnel-group RoadWarrior ipsec-attributes
    isakmp ikev1-user-authentication hybrid


    Certificate Authentication -- This uses certificates on both clients
    and servers, and can work in main mode
    instead of aggressive mode. It's
    possible to load a different cert into
    each client and not use XAuth at all,
    like in a site-to-site VPN. The VPN
    dialer supports this, but almost
    everyone uses XAuth.

    But some shops load all their road
    warriors with the same cert, same
    private key, and then use XAuth to
    distinguish one client from another.
    Sometimes the VPN client .zip with the
    client cert, private key and all, is
    available for download on some open
    external web page. Even with the
    common client cert so freely
    distributed, this behaves the same as
    Mutual Group Authentication. It's
    older, and it's probably better than
    mutual group auth / hybrid xauth.

    upside: works in Main Mode, not as
    cisco-proprietary. downside: confuses
    netadmins, fails-open on
    misconfiguration (if you don't add
    XAuth). And the configuration is a
    tangled mess.

    I don't think you have to configure XAuth in their VPN dialer at all.
    It pops up a box if asked. That's it.

    I don't know racoon well, but it's more likely to support Certificate
    Authentication and PSK, less likely to support Mutual Group
    Authentication.

    There is also MTU fun. Two IOS devices supposedly will to PMTU-D on
    various kinds of tunnels including gre and ipsec. I'm not sure PIXen
    or the Windows/Mac VPNClient _ever_ do PMTU-D---in some packet dumps
    they seem to punt by quietly defaulting to a small MTU like 1200 -
    1300. and I think BSD/Linux doesn't do PMTU-D either but might
    confuse you by having a larger default.

    source: http://mail-index.netbsd.org/current-users/2009/01/27/msg007643.html

    July 6, 2010

    Linux IPSec VPN client

    1. vpnc, my favorate
    2. http://www.shrew.net/software , this one looks really good but I have not tested it
    3. linux kernel ipsec + user land tools such as ipsec-tools

    Other things to read:
    http://www.tjhsst.edu/admin/livedoc/index.php/IPSec_VPN

    July 2, 2010

    mini2440 nand issue

    I had a lot of bad blocks in my mini2440/micro2440 device. I tried format, bon part, etc, and nothing seemed to work.

    Today, I uploaded the 128M root file system instead of the 64M one, and it started to work, still with a bunch of bad blocks. Then I did "f" to format the NAND flash and "x" to format nand flash for linux, and re-downloaded the 128M root file system, and no bad block appeared, and everything is working.

    The weird thing is that my flash chip says 64M. However, my kernel detects 128M. Why is 128M working? not sure. All I know is that it works now.

    June 23, 2010

    Image hard drive using dd

    Update: If your drive have bad sectors, this method does not work well. I tried Clonezilla, and the result is as bad. Either my disk is very bad (but windows XP is running fine) or there is a better way to do this.

    1. Boot from the live cdrom distribution such as puppy linux.
    2. Switch to root.
    3. Make sure NO partitions are mounted from the source hard drive.
    4. (optional) Fill the drive empty space with 0
     # dd if=/dev/zero of=/tmp/delete.me bs=8M; rm delete.me
    1. Mount the external HD.
        # mount -t vfat /dev/sda1 /mnt/sda1
    2. Backup the drive.
        # dd if=/dev/hda conv=sync,noerror bs=64K | gzip -c  > /mnt/sda1/hda.img.gz

      "dd" is the command to make a bit-by-bit copy of "if=/dev/hda" as the "Input File" to "of=/mnt/sda1/hda.img.gz" as the "Output File". Everything from the partition will go into an "Output File" named "hda.img.gz". "conv=sync,noerror" tells dd that if it can't read a block due to a read error, then it should at least write something to its output of the correct length. Even if your hard disk exhibits no errors, remember that dd will read every single block, including any blocks which the OS avoids using because it has marked them as bad. "bs=64K" is the block size of 64x1024 Bytes. Using this large of block size speeds up the copying process. The output of dd is then piped through gzip to compress it.

    3. To restore your system:
        # gunzip -c /mnt/sda1/hda.img.gz | dd of=/dev/hda conv=sync,noerror bs=64K
    4. Store extra information about the drive geometry necessary in order to interpret the partition table stored within the image. The most important of which is the cylinder size.
        # fdisk -l /dev/hda > /mnt/sda1/hda_fdisk.info

    Notes:

    One of the disadvantages of the dd method over software specifically designed for the job such as Ghost or partimage is that dd will store the entire partition, including blocks not currently used to store files, whereas the likes of Ghost understand the filesystem and don't store these unallocated blocks. The overhead isn't too bad as long as you compress the image and the unallocated blocks have low entropy. In general this will not be the case because the emtpy blocks contain random junk from bygone files. To rectify this, it's best to blank all unused blocks before making the image. After doing that, the unallocated blocks will contain mostly zeros and will therefore compress down to almost nothing.

    Mount the partition, then create a file of zeros which fills the entire disk, then delete it again.

    # dd if=/dev/zero of=/tmp/delete.me bs=8M; rm delete.me

    source: http://www.linuxweblog.com/dd-image

    June 21, 2010

    mini_httpd and cgi

    1. to specify the cgi pattern, you need to quote it and prepend with ./. For example, to make *.cgi files as cgi, use "./*.cgi"

    June 15, 2010

    The smallest XML parser in C?

    I always love to see things done small and nice. If you are looking for a simple XML parser, I found ezXML to be the best. One C file, One H file. Compiles without warning. Just great. Here is the link:

    http://ezxml.sourceforge.net/

    Vim: search/replace to change cases

    The following command will change all upper case words to lower case

    :%s/[A-Z]/\L&/g

    The list of all special commands:

    Replacement part of the S&R has its own special characters which we are going to use to fix grammar:

    #
    Meaning
    #
    Meaning
    &
    the whole matched pattern
    \L
    the following characters are made lowercase
    \0
    the whole matched pattern
    \U
    the following characters are made uppercase
    \1
    the matched pattern in the first pair of \(\)
    \E
    end of \U and \L
    \2
    the matched pattern in the second pair of \(\)
    \e
    end of \U and \L
    ...
    ...
    \r
    split line in two at this point
    \9
    the matched pattern in the ninth pair of \(\)
    \l
    next character made lowercase
    ~
    the previous substitute string
    \u
    next character made uppercase

    June 11, 2010

    QML Module and Property Access

    If the main QML file includes modules from other files, it CANNOT see ids or variables defined in those files. You will have to use

    "property alias myvar: localmod_id"

    to expose localmod_id to your main QML file. variable exposure was documented, but entire object id exposure is not documented in other places.

    Qt QML setContextProperty

    In order to use a C++ Class function in your QML file, you can expose the class itself using setContextProperty("myvar",pointer_to_your_class_instance), then call myvar.func() in your QML file. However, there is a trick to get this to work.

    In your class definition file, these functions have to been exposed as "public Q_SLOTS:", otherwise QML cannot see it.

    June 10, 2010

    Convert FLV to 3GP file

    ffmpeg\bin\ffmpeg.exe -i input.flv -s qcif -vcodec h263 -acodec libfaac -ac 1 -ar 8000 -r 25 -ab 32000 -y outputfile.3gp

    May 20, 2010

    Good Free screen video capture / record, works under Vista

    A good screen capture / record to video FREE program, directly from Microsoft, is called CommunityClips. It works for Windows XP and Vista. You an download it for FREE at
    http://officelabs.com/projects/communityclips/Pages/Default.aspx