December 28, 2010

Use sqlite3 with codeigniter

Codeigniter is a small, fast, and well-documented web framework. However, currently (as of version 1.7.3), only sqlite2 is supported. I made codeigniter 1.7.3 work with sqlite3, including the scaffolding feature, which I really like.

Here is how to make codeigniter 1.7.3 work with sqlite3:

1. Download the php-based sqlite3 PDO driver for codeigniter. This driver is based on the driver in the codeigniter wiki, but fixed up so it works with v1.7.3 and with scaffolding.

Download the sqlite3 PDO driver (based on the wiki driver 0.2)

2. Edit system/database/DB_driver.php,  around line 831, add the 4 lines below starting with '+'.


foreach($query->result_array() as $row)
{
if (isset($row['COLUMN_NAME']))
{
$retval[] = $row['COLUMN_NAME'];
}
+ else if ($this->platform()=="pdo")
+ {
+ $retval[] = next($row);
+ }
else
{
$retval[] = current($row);
}
}


3. Create directory /pdo in /database/drivers and copy to this directory
  driver *.php files
4. Create SQLite3 database file, and put it to any directory.
  My database file is [APPPATH]/db/base.db
5. In application database config [APPPATH]/config/database.php  set next settings:
 
$db['default']['hostname'''; 
$db['default']['username''';
$db['default']['password''';
$db['default']['database''sqlite:'.APPPATH.'db/base.db';
$db['default']['dbdriver''pdo'

Enjoy.

December 27, 2010

vimdiff ignoring white space

I had been searching for a way to ignore white spaces while using vimdiff. Unfortunately, vimdiff -h yields the generic Vim help. I finally found that including the following line in vimrc solves the problem.
set diffopt+=iwhite
From the command line:
vimdiff -c 'set diffopt+=iwhite' ...
 

December 22, 2010

codeignitor removes index.php

Ok, try
<IfModule mod_rewrite.c>
    
RewriteEngine On
    RewriteBase 
/

    
RewriteCond %{REQUEST_FILENAME} !-f
    RewriteCond 
%{REQUEST_FILENAME} !-d

    RewriteRule 
^(.*)$ /index.php?/$1 [L] <-- do not forget the after index.php!
</
IfModule>

<
IfModule !mod_rewrite.c>
    
# If we don't have mod_rewrite installed, all 404's
    # can be sent to index.php, and everything works as normal.

    
ErrorDocument 404 /index.php</IfModule
in config.php set
$config['index_page'"";$config['uri_protocol']    "AUTO"
With this htaccess index.php-hiding works for me with PHP4 and PHP5 running PHP as a CGI

Corss Compile tcpdump for linux/mips

1. download libpcap (I use version 1.1.1 at the time of post) and tcpdump (v4.1.1 as of time of post)

2. unzip both directory under the same directory, such as download/libpcap-1.1.1 and download/tcpdump-4.1.1


Build libpcap:

3. cd libpcap-1.1.1 ;

4. vi configure; search for "linux version", and remove the entire section of "case" under "linux)" until "do we have the wireless extensions". This is so that ./configure does not try to detect linux (and fail). Our linux is fine.

5. CC=/YOUR-CROSS-COMPILER-PATH/mips-openwrt-linux-gcc ./configure --host=mips-linux  --with-pcap=linux
6.  make. after make is successful, you'll have a libpcap.a

Build tcpdump:

7. cd ../tcpdump-4.1.1

8 .vi configure; earch for "linux version", and remove the entire section of "case" under "linux*)" until ";; \n *)".

9. CC=/YOUR-CROSS-COMPILER-PATH/mips-openwrt-linux-gcc ./configure --host=mips-linux  --with-pcap=linux


10. vi Makefile; search for /usr/include and remove them; the Makefile by mistake include including files in the host system. Remove them.


11. make. you can strip the final tcpdump if you like. all done.

December 17, 2010

How to cross compile tinyproxy for mips

tinyproxy version: 1.8.2

1. Change the configure file to comment the section containing "Check for asciidoc" until all the way to "ac_config_files=" (not including). Also Remove the lines that test "HAVE_A2X_TRUE".

2. CC=/home/tzhang/filter/trunk/toolchain_bin/mips-openwrt-linux-gcc ./configure --host=mips-linux --enable-filter --disable-upstream --disable-reverse --enable-transparent --disable-regexcheck

3. modify config.h: search for "rpl_", and comment the two lines that contains rpl_malloc and rpl_remalloc. Use /* */ syntax to comment out.

4. vi src/Makefile, search for "LDFLAGS", and append " -s" to it (to strip the final binary)

5. Chanage Makefile to only build src. Find SUBDIRS , comment out all other directories other than "src".

6. Make. find the binary at src/tinyproxy.

December 16, 2010

bfilter

A web proxy filter that blocks ads, achieves effects like Firfox AdBlock Plus.

http://Bfilter.sourceforge.net

December 15, 2010

vim global command

http://www.networkcomputing.com/unixworld/tutorial/009/009.part3.html

syntax: g/stuff-to-search/[range]EX command

example:

global /^/ + delete
:g/blah/d  , this deletes all lines containging 'blah'
:g/blah/ ,+ delete , this deletes all lines and next lines that containing 'blah'


See more at http://vimdoc.sourceforge.net/htmldoc/cmdline.html#Command-line

December 11, 2010

iptables SO_ORIGINAL_DST

this option in socket call can let you retrieve the original IP and port number of a redirected TCP session. Brilliant.

December 9, 2010

Git Get Started

Getting Started
Let's say you have a development project in the directory devproject. Let's start using Git to manage this project.
First off install Git. In Debian and Ubuntu we just need to do "aptitude install git"
cd devproject
git init
git add .
git commit -m "My first commit"
At this point you have all the benefits of a local version control system but no one can see your work. To make it available to other people we'll need to install a remote repository on your server. At home, I only allow people to access my code through SSH so that's the method I am going to talk about here.
ssh alex
mkdir -p /var/git/devproject.git
cd /var/git/devproject.git
git --bare init
exit
Your remote Git server is now configured so let's set up our local repository to talk to the remote repository
cd devproject
git remote add origin ssh://alex/var/git/devproject.git
We can now push our changes to that repository:
git push origin master
 
git clone: clone from a remote a new local repository
git fetch: update the local "remote" directory
git pull: = git fetch + git merge

December 8, 2010

Compile Openssl for Linux MIPS

1. Grab openssl source 1.0.c
2. Grab the Linux-MIPS patch at http://svn.cross-lfs.org/svn/repos/patches/openssl/openssl-0.9.8k-mips_support-1.patch
3. apply the patch: the patch basically just add a few lines to the Configure file. you can do that manually if you want.
4. CC=YOUR-MIPS-CC ./configure linux-mips  (add "shared" if you want to build shared library)
5. make

December 7, 2010

Increase VNC Speed (tightvnc)

  • If you select the "Low-bandwidth connection" option under "Connection profile" a lot of the default options will be changed. You will notice a drastic increase in performance from that allowance.
  • If you want to tweak the connection further, click the "Options" button to see what is under the hood. Choose the "Tight" encoding option to use TightVNC's compression. Select "Use 8-bit color" to reduce the number of colors and therefore increase speed. Below that, slide the compression bar down to its fastest point to make major changes on performance. Keep in mind that this will also affect the image quality.

December 6, 2010

rSync for Windows

1. Download the zipfile for DelteCopy (Without Installer)
2. Unzip it. It includes rsync.exe for Windows
3. copy deltecd.conf to rsyncd.conf
4. run it as a daemon: rsync --daemon --no-detach --config=\PATH\rsyncd.conf
5. if that works, it will open a port on 873 (make sure you firewall is off).
6. to make it permanent, you can use "srvany" to install it as a service.

More detailed instructions can be found at HERE.

Edit Motion Jpeg on Windows

=-=-=-=-=-=-=-=-=-=-=-=-=-=-=-=-=-=-=-=-=-=-=-=-=-=-=-=-=-=-=-=-=
Background:
Digital Still Cameras for the last couple of years have been able to record video. The cameras put the video (and usually PCM aka RAW audio) in either Quicktime (MOV) or AVI containers.

The video codec is usually Motion JPEG (FourCC:MJPG) because the chip in the camera usually makes JPG and making Motion JPEG is a trivial extension since MJPEG is close to sequential JPEGs.

=-=-=-=-=-=-=-=-=-=-=-=-=-=-=-=-=-=-=-=-=-=-=-=-=-=-=-=-=-=-=-=-=
Technical hurdle on the PC:
To be able to play video or audio you need to have a de-compressor to understand the container (eg MOV, AVI) AND a de-compressor for each stream in the container.
Container examples: "MOV" –QuickTime Movie, "AVI" – Windows’ implementation of the “RIFF” format.
video examples: "M2V" -mpeg2 video, "MJPG" - Motion JPEG.
audio example: "PCM" - raw audio, "AC3" - Dolby Digital audio.

The algorithm is either built into the tool (eg MOV decode in QuickTime, Adobe & free tools like MPlayer etc) OR it has to be present as installed component on the PC.

On Windows there are TWO sorts of CODECs. The original "Video For Windows" (VfW) and DirectShow.
Editing tools (in general) ONLY work with VfW codecs.

Windows XP, Vista and Win7 all ship with DirectShow MJPEG codecs, but not VfW ….so easy to watch but you can’t EDIT.

=-=-=-=-=-=-=-=-=-=-=-=-=-=-=-=-=-=-=-=-=-=-=-=-=-=-=-=-=-=-=-=-=
The problem:
So you have these MOV[ MJPEG + PCM ] or AVI[ MJPEG + PCM ] files and want to edit them to do something as simple as put them on a DVD for mom to see the new baby.

=-=-=-=-=-=-=-=-=-=-=-=-=-=-=-=-=-=-=-=-=-=-=-=-=-=-=-=-=-=-=-=-=
The solution:
You can buy a VfW Motion JPEG decoder (eg http://www.morgan-multimedia.com/M-JPEG2000/index.htm )
OR you can get it in freeware.

FFDshow ( http://sourceforge.net/projects/ffdshow/ ) uses the libavcodec library developed in the FFmpeg Movie Player ( http://ffmpeg.org/ ) open-source effort. The libavcodec library has TONS of codecs. It is better known for its MPEG4, Xvid, DivX but it also has a lot of others. One of those “others” is MJPG.

The FFDshow project takes that decode (and in some cases encode too) capability and presents them as VfW (as well as DirectShow) codecs!

Viola, you now have the ability to understand MJPEG in video editing tools. (and tons of other codecs if you enable them).

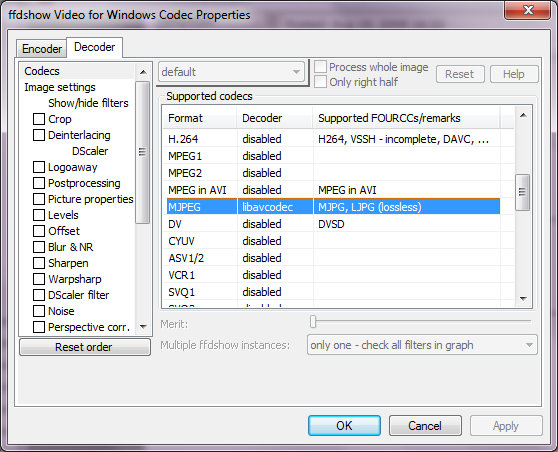
The only thing you need to do after installation is go to the Start Menu’s “FFDShow VFW Configuration” and under the “Decoder” tab’s “Codecs” (at the top). Then on the right side scroll down to MJPEG and change it from “disabled” to “libavcodec”.


=-=-=-=-=-=-=-=-=-=-=-=-=-=-=-=-=-=-=-=-=-=-=-=-=-=-=-=-=-=-=-=-=
An Aside:
This will become more and more important in the years to come because motion films are shot and delivered to digital cinemas as “2k”, “4k” or “8k” ( http://en.wikipedia.org/wiki/Digital_cinema ) in MOTION JPEG2000 ( http://en.wikipedia.org/wiki/JPEG_2000#Motion_JPEG_2000 ) . It’s only so long before INDIE film makers and then pro-sumers want to edit in these resolutions.

‘thanks for reading.

[EDIT - LeChineur had problems with this solution. Instead of you having to read this entire thread I'm putting an edit here to summarize the problem]
In the end it came down to this. LeChineur's FFDshow install didn't work. In summary:

Originally Posted by LeChineur
This got me thinking. So I checked and I indeed did not have the ff_vfw.dll on my system. So I uninstalled the version 3.054 of FFDShow (dated 08/04/2009) which was installed on my system, downloaded and installed version 3.052 (dated 08/03/2009) and voila, I then had the ff_vfw.dll.

That solved the problem. PP now plays the video clip fine, as well as all the other "AVI" (MJPEG) clips from my Canon camera. Incredible!

So rallymax, your original post was in fact correct. Why the version of FFDShow that I first downloaded didn't install the correct dll the first time is still a mystery, but whatever...

December 4, 2010

use .htaccess to protect your web folder

Generate the password file

htpasswd -c .htpasswd fred
(where fred is the username you want to use). You'll be prompted to enter and retype your password, then the .htpasswd file will be created for you.

Next, upload this file to your website. Make sure you place it outside the Web root of your site if possible, as you don't want just anyone to be able to view the file! For example, place it above your public_html or htdocs folder. (Having said this, Apache is often set up by default to block web-based access to files beginning with .ht. Better safe than sorry though!)
If you can't place your .htpasswd file outside your Web root, name it something that's not easily guessable - for example, .htxuymwp - so that people won't be able to find it easily. (In addition, it helps to start the filename with .ht; as mentioned earlier, Apache usually blocks access to files starting with .ht.)

Creating the .htaccess file

Protecting a folder

To password protect a folder on your site, you need to put the following code in your .htaccess file:

AuthUserFile /full/path/to/.htpasswd
AuthType Basic
AuthName "My Secret Folder"
Require valid-user
/full/path/to/.htpasswd should be the full path to the .htpasswd file that you uploaded earlier. The full path is the path to the file from the Web server's volume root - for example, /home/username/.htpasswd or C:\wwwroot\username\.htpasswd. (If you're not sure of the full path to your site or home directory, ask your Web hosting company for this info.)
The above .htaccess file will password protect all files in the folder that it is placed in, and all sub-folders under that folder too. So if you wanted to password protect your entire site, you would place the .htaccess file in your Web root folder.

Protecting a file

To password protect just a single file in a folder, use the following .htaccess file:

AuthUserFile /full/path/to/.htpasswd
AuthType Basic
AuthName "My Secret Page"

<Files "mypage.html">
  Require valid-user
</Files>

This will password protect just the mypage.html file in the folder where you put the .htaccess file.

December 3, 2010

Export Audio from Windows Movie Maker

In Windows Movie Maker....
To save only the audio track of a video clip...
drag the video to the "Audio/Music" track.
Then go to...File > Publish Movie and you'll get options
for audio quality and save it to a wma audio file.

This will result in a .wma audio file. Be sure
to drag the clip all the way to the left on the
timeline or you will have dead air at the
beginning.

December 1, 2010

How to turn a Windows application into Windows Service

http://www.tacktech.com/display.cfm?ttid=197

The Windows NT/2000 Resource Kit provides two utilities that allow you to create a Windows user-defined service for Windows applications and some 16-bit applications (but not for batch files).

Whats needed for Windows NT/2000:
Instrsrv.exe installs and removes system services from Windows NT/2000
Srvany.exe allows any Windows application to run as a service.
You can download both files here srvany.zip

This zip includes three files. The two you need srvany.exe and instsrv.exe to install the services and also srvany.wri which documents everything you can do with the program.
Note: Make sure the Services Manager is closed while running the DOS commands.


You will need to put these files in a directory called reskit At a MS-DOS command prompt(Start | Run | "cmd.exe"), type the following command:
<path>\reskit\INSTSRV.EXE "Service Name" <path>\reskit\SRVANY.EXE
This creates the service in the Services manager and the registry keys to setup what program to run.

http:www.tacktech.com/


Next open regedit.exe Start | run | regedit.exe

http:www.tacktech.com/


Next navigate to this registry key.
HKEY_LOCAL_MACHINE\SYSTEM\CurrentControlSet\Services\service name

http:www.tacktech.com/


From the Edit menu, click Add Key and name it Parameters
Next from the Edit menu, click Add Value and type this information.
Value Name: Application
Data Type : REG_SZ
String : <path>\<application.ext>

http:www.tacktech.com/


Now you can start your service from the Service Manager

http:www.tacktech.com/


With this same program you can remove the service also. Just run this command from command prompt.
<path>\reskit\INSTSRV.EXE "Service Name" REMOVE